Guide: How to create an invoice
In about ten minutes to your first invoice: from your business details and line items through sales tax and payment terms to the PDF you send. Every step can be followed in the real tool.
Table of contents
- Get started
- Preparation
- Step by step
- 1. Set up your business
- 2. Fill in the invoice details
- 3. Add your logo and check your business details
- 4. Add the customer
- 5. Enter the line items
- 6. Set the sales tax
- 7. Add discounts, fees and a deposit
- 8. Say how to pay
- 9. Check, preview and design
- 10. Export and keep records
- More
- After the export
- Reports and data backup
- Payment reminders
- Data backup and storage
- Special cases
- Using it on your phone
- Troubleshooting
- Keyboard shortcuts
- Related topics
The short version in five steps
- Enter your business details once in the welcome card (or under “Your business & logo”).
- Add the customer and the line items; mark each line taxable or non-taxable and enter the sales tax rate.
- Pick the payment terms and how the customer can pay.
- Open the Check section and fix what it reports; the preview on the right shows the final invoice.
- Click Export, download the PDF and send it. Keep a copy of what you sent.
Preparation: what to have ready
Step 1: Set up your business
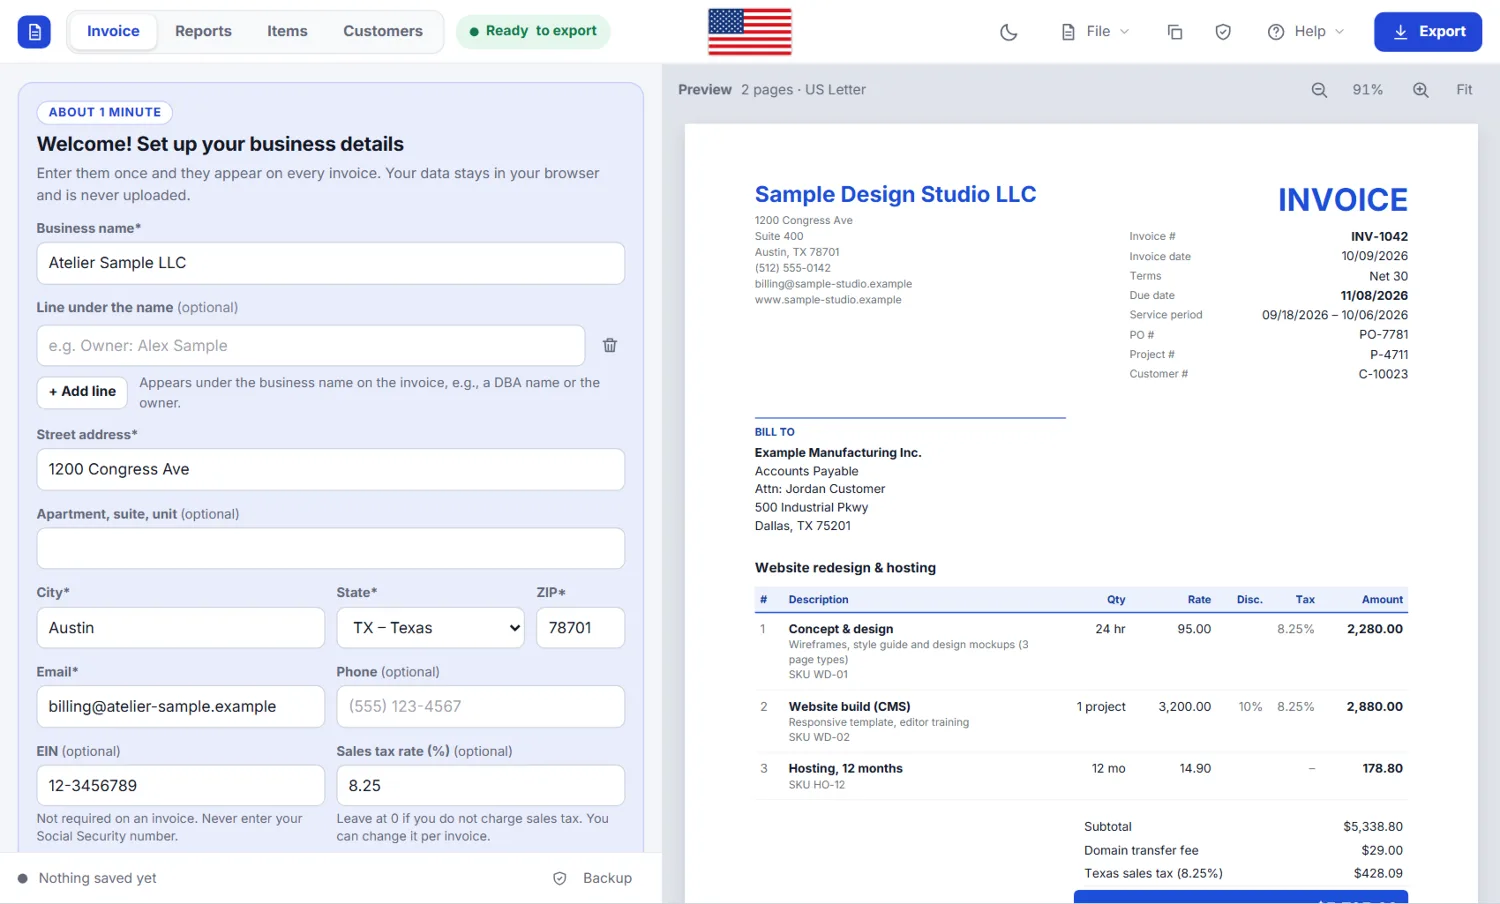
The first time you open Invoice Studio, a welcome card appears at the top of the form. Enter your business name, street address, city, state and ZIP code, your email, and optionally your phone, EIN, a default sales tax rate, the usual payment terms and your logo. Click Save and start an invoice.
Everything stays in your browser. From then on every new invoice starts with these details. You can change them at any time under Your business & logo.
An EIN is not required on an invoice. If you do not have one, leave the field empty and never enter your Social Security number.
Step 2: Fill in the invoice details
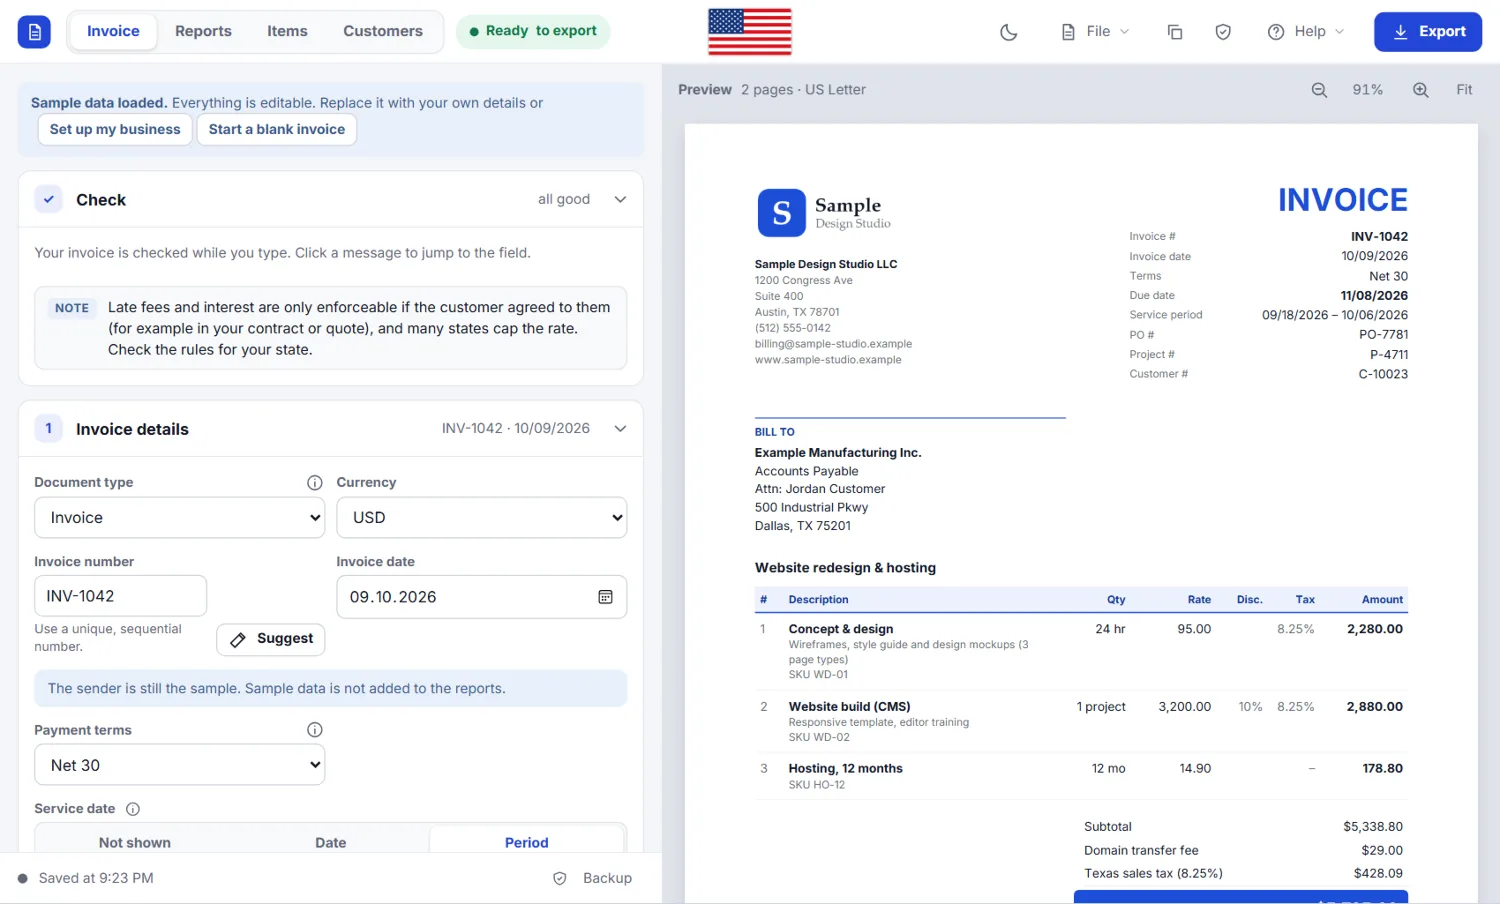
Open Invoice details. Check the invoice number (use a unique, sequential number such as INV-1001; the wand button suggests the next one) and the invoice date. Choose the document type: Invoice, Credit memo or Deposit invoice.
Under Service date you can show the date or the period in which you delivered the work. It is optional in the U.S., but it helps customers and auditors, especially for monthly services.
Payment terms
Pick the terms from the list: Due on receipt, Net 7, Net 15, Net 30, Net 60 and so on, or enter your own number of days or a specific due date. “Net 30” means the whole amount is due 30 days after the invoice date. The due date is calculated for you and printed on the invoice. Terms bind your customer only if they were agreed in a contract, quote or order, or if the customer accepts them.
Step 3: Add your logo and check your business details
Open Your business & logo. Drag your logo onto the box or click Upload (PNG, JPG, SVG or WebP). The logo is processed in your browser. Choose left or right and set the height with the slider.
Below you can add extra lines under your business name, for example a DBA name or the owner. In the footer you can print license or registration numbers, which some states and trades require on invoices, for example “TX Contractor License #12345”.
Step 4: Add the customer
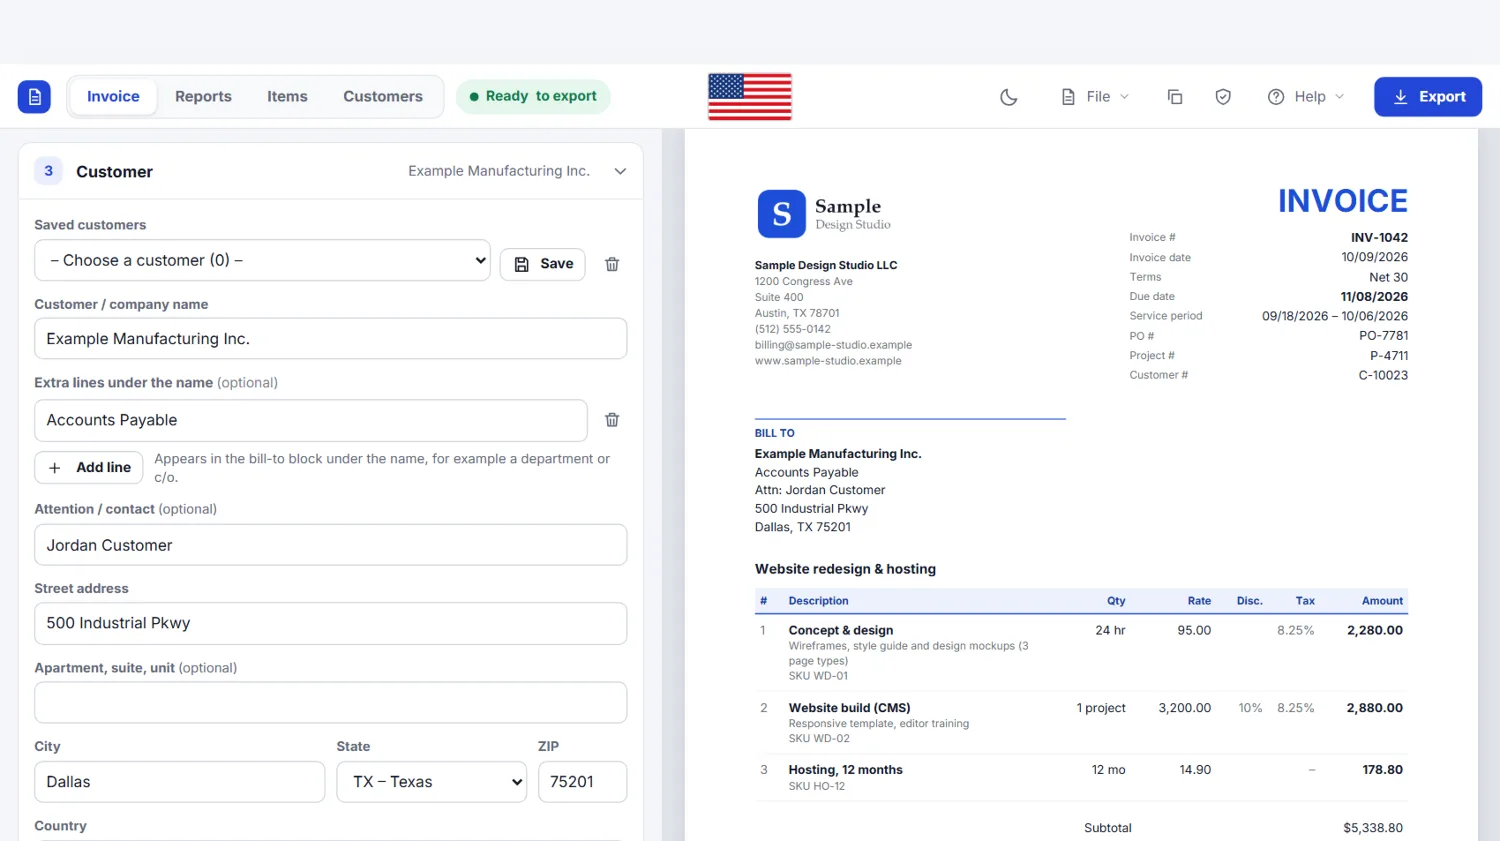
Open Customer. Enter the company or person you bill, the billing address and, if useful, an attention line such as “Accounts Payable”. Add the customer’s PO number, contract number or project number when they gave you one: large companies and government agencies often cannot pay without it.
If the goods or services go to another address, tick Different ship-to address. With Save you can store the customer and pick them again next time from Saved customers.
If the customer is tax-exempt, enter their exemption or resale certificate number in the field below the address; it is printed on the invoice.
Step 5: Enter the line items
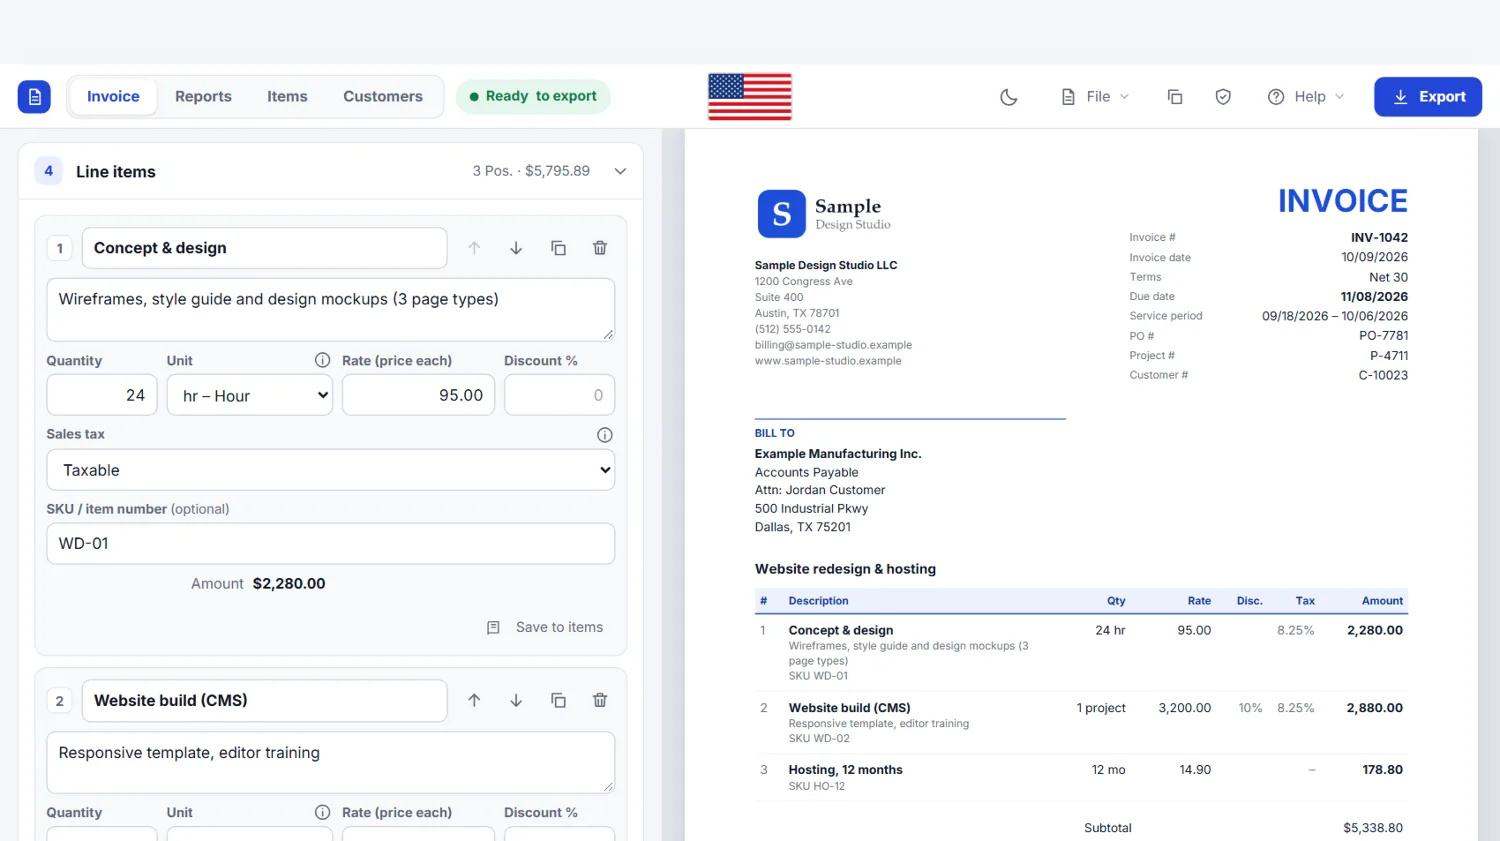
Open Line items and click Add line item. For each line enter a description, the quantity, the unit (each, hour, day, project, pound …) and the rate. The amount is calculated. Use Discount for a percentage off a single line.
Under each line choose Taxable or Non-taxable. Click Save to items to store a line you use often, and use Insert from saved items to add stored lines later. The Items tab at the top lists everything you saved.
Step 6: Set the sales tax
Open Sales tax. Enter the sales tax rate in percent. It applies to every taxable line of this invoice. Use the combined rate for the sale (state plus local). If you do not charge sales tax, leave it at 0. Optionally enter a tax label such as “Texas sales tax”, which replaces “Sales tax” on the invoice.
Invoice Studio does not look up rates. Rules differ by state and sometimes by city or county, and they depend on what you sell and where it ships. Services are often not taxable, goods usually are, and shipping is taxable in some states only. Check with your state’s revenue department or a tax professional.
Tax-exempt customers
If the customer gave you a resale or exemption certificate, mark the lines Non-taxable. Under Sales tax a text field appears for the note on the invoice, with standard reasons such as “Exempt: resale (certificate on file)”. Keep a copy of the certificate: it is your proof in an audit.
Step 7: Add discounts, fees and a deposit
Open Discounts, fees & deposit. Add a discount for the whole invoice, shipping & handling, packaging or another fee. Each one can be a fixed amount or a percentage, and can be taxable or not.
If the customer already paid a deposit, enter it under Deposit / payments already received. It is subtracted from the total, and the invoice shows the balance due. Mention the deposit invoice under Reference to a previous invoice (in Invoice details).
Step 8: Say how to pay
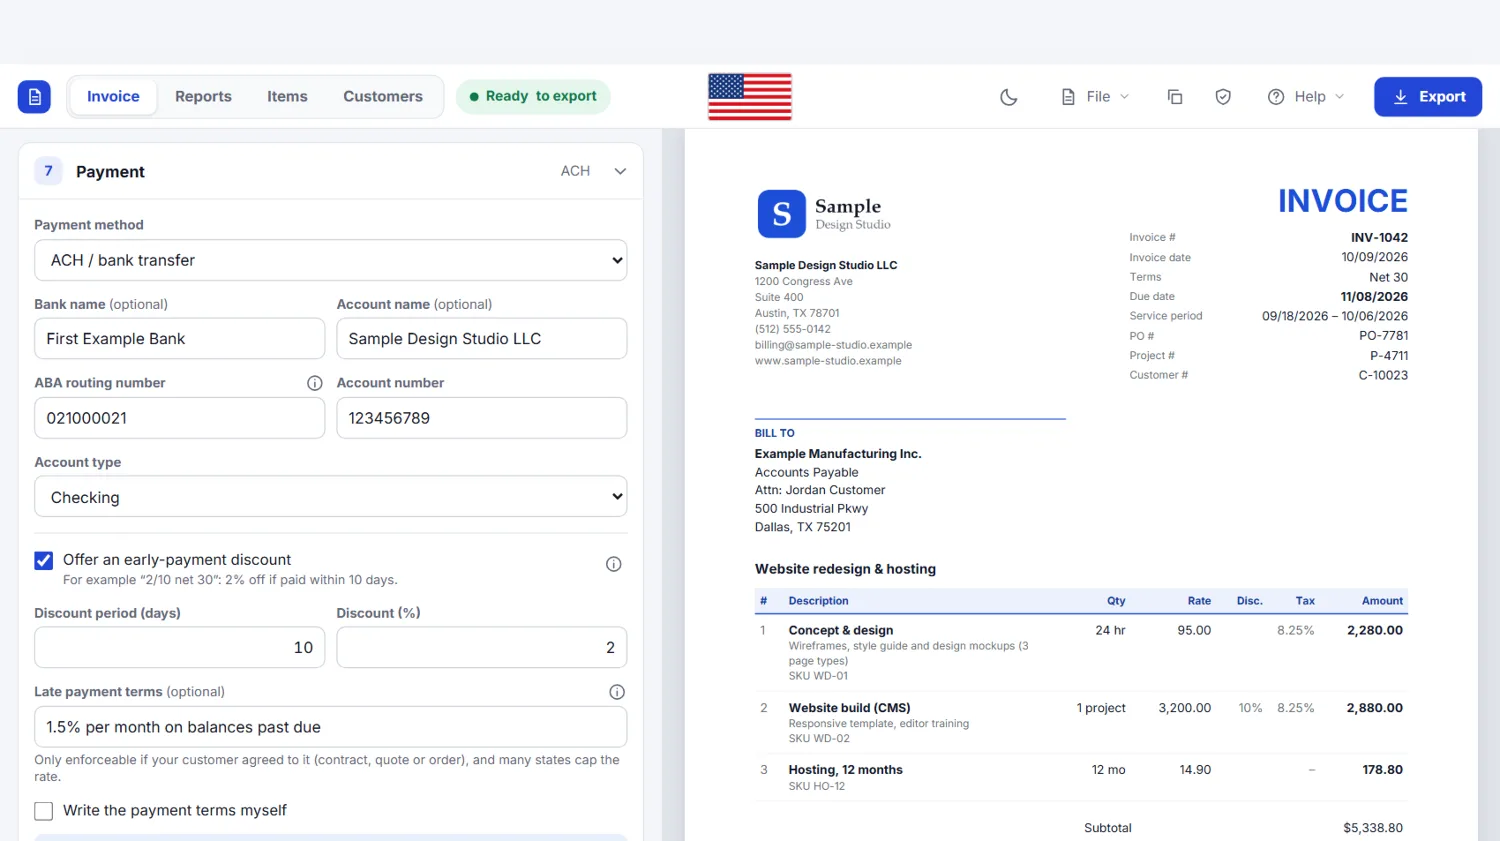
Open Payment and choose the payment method:
- ACH / bank transfer and wire transfer: bank name, account name, ABA routing number (nine digits, checked for you) and account number
- Check: the name the check should be made out to and the address to mail it to
- Card / online payment link: paste your payment link
- Other: for example Zelle, PayPal or Venmo instructions
You can offer an early-payment discount, for example “2/10 net 30”: 2% off if paid within 10 days. The payment terms text on the invoice is created for you.
Late payment terms
Enter wording such as “1.5% per month on balances past due” in Late payment terms. Late fees and interest are generally only enforceable if the customer agreed to them in advance (contract, quote, order), and states limit the rate. Printing the term on the invoice is a reminder, not a substitute for the agreement.
Step 9: Check, preview and design
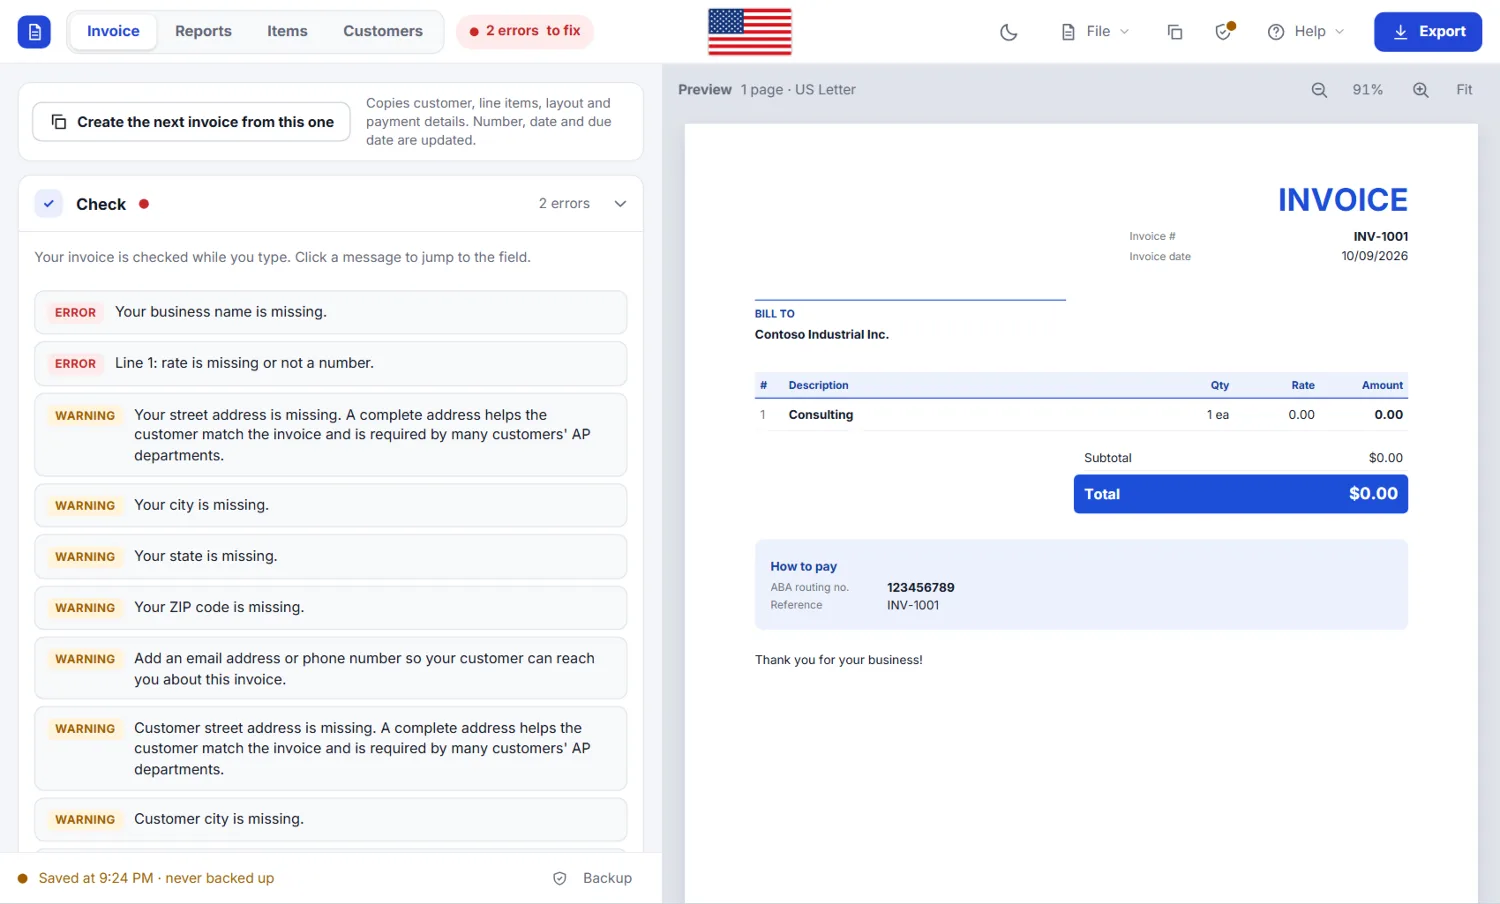
The Check section at the top lists errors, warnings and notes while you type. A click on a message jumps to the field. The status chip in the header shows Ready to export when nothing blocks the invoice. Errors are also shown right at the field.
The preview on the right is the invoice exactly as it will be printed in U.S. Letter size. Click text in the preview to jump to its field. Under Text & design you can set an introduction and closing text, notes or terms, the accent color and font size, and reword any label (for example “Rate” to “Price”).
Step 10: Export and keep records
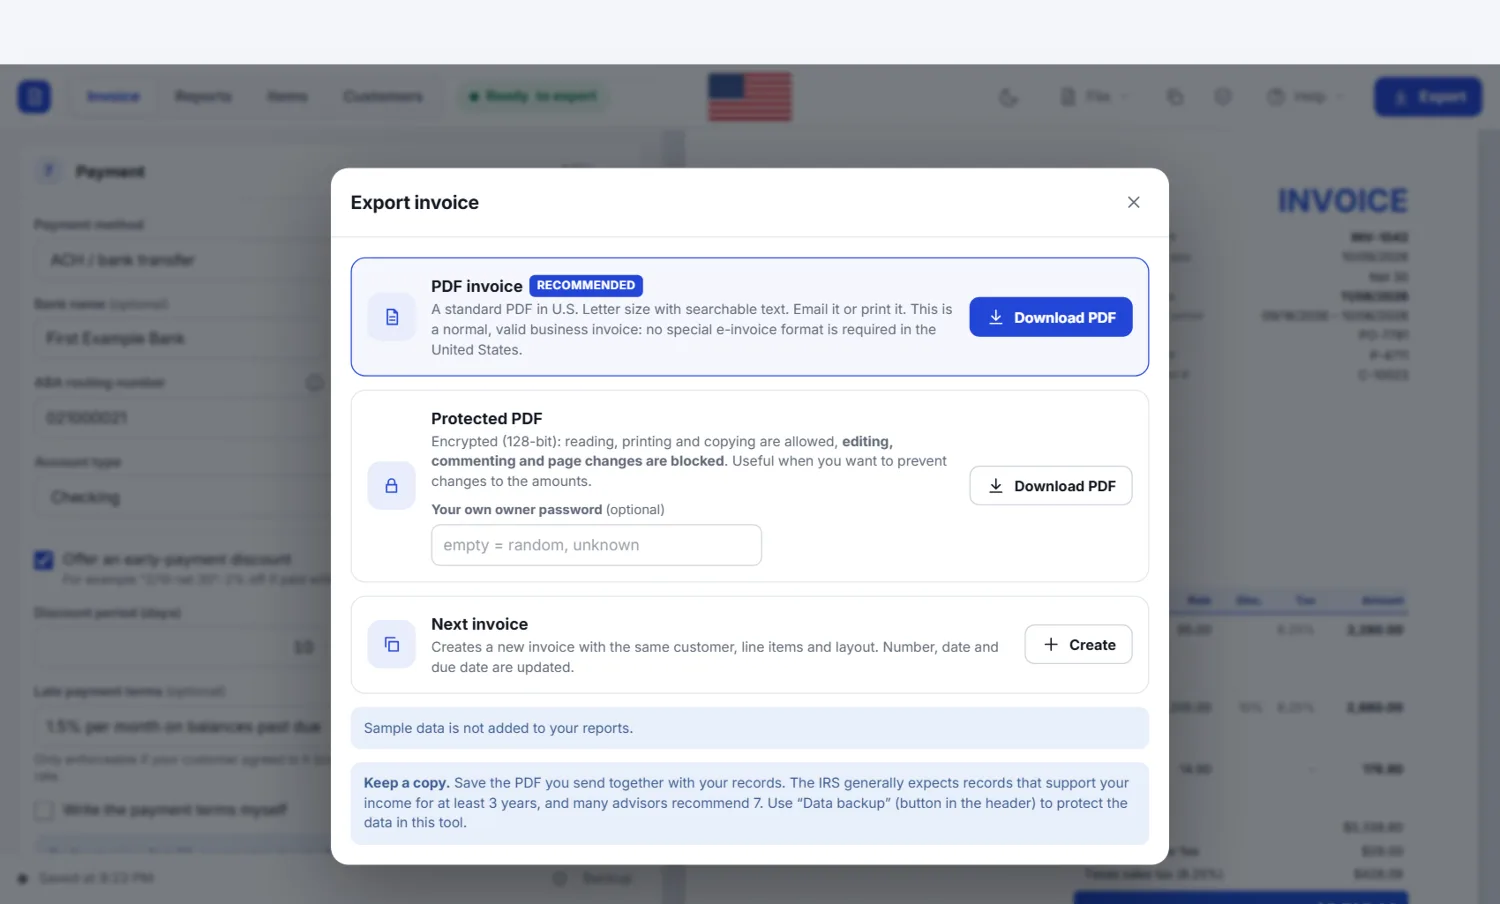
Click Export. Download PDF creates a standard PDF in U.S. Letter size with searchable text: email it, print it or upload it to your customer’s portal. A normal PDF is a valid invoice; the U.S. has no special e-invoice format for business customers. The protected PDF additionally blocks editing and commenting.
Keep a copy. Save the PDF you send together with your records. The IRS generally expects records that support your income and deductions for at least 3 years, and many advisors recommend 7. Back up your data regularly (the Data backup button in the header), because it lives only in your browser.
After the export
- Send the PDF to the customer, with the invoice number and due date in your email.
- History (File → Exported invoices) lists every exported invoice, helps catch duplicate numbers and lets you use an old invoice as a template.
- Next invoice (button in the header) opens a new invoice in a new tab with the same customer, lines, layout and payment details; number and dates are updated.
- When the customer pays, open Reports and mark the invoice as paid or record a partial payment.
Reports and data backup
The Reports tab shows what you earned: revenue before tax, expenses, profit and the sales tax collected, by month or year, with a chart, a monthly table and sales tax by rate and quarter. Every exported invoice appears automatically. You record expenses with + Expense and invoices issued elsewhere with + Invoice. + Deposit records money received before an invoice.
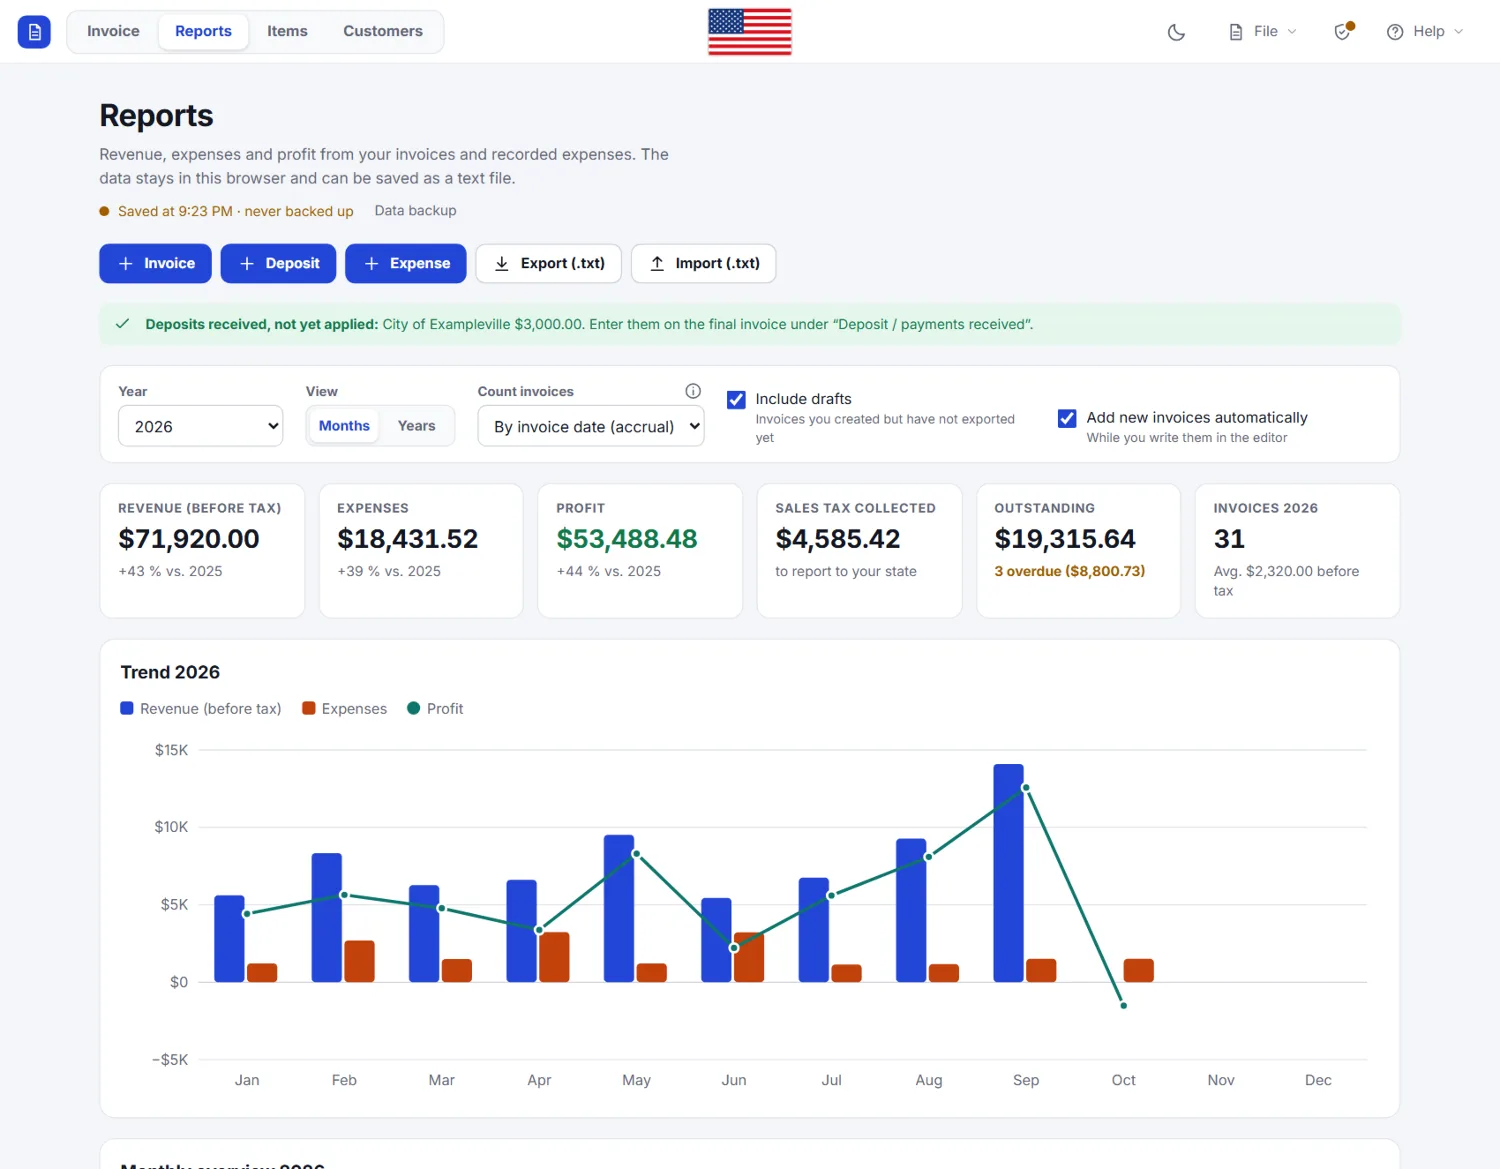
The reports are a simple overview, not bookkeeping. You can count invoices by invoice date (accrual) or by payment date (cash); your tax professional decides which method applies to you. Export (.txt) and Import (.txt) save and restore the report data. An example report file is available.
Payment reminders
For an unpaid invoice click the envelope icon to create a friendly reminder, a past-due notice or a final notice as a letter PDF, as text or as an email. Late fees and interest are only added if you type in a rate, and only the amounts you agreed with the customer belong there.
Data backup and storage
All data is stored in your browser only. Open Data backup to download a backup file or to let Chrome or Edge write a backup into a folder automatically after every change. The status line under the form shows when your data was last saved and backed up.
Special cases: what to do
The same steps apply as above. These notes say what to watch in addition.
Credit memo
Choose Credit memo as the document type and list the original invoice under Reference to a previous invoice. Enter the lines you credit with positive amounts; the memo reduces revenue in the reports.
Deposit invoice and final invoice
Create a Deposit invoice for the advance. When the money arrives, record it under Reports → + Deposit or mark the invoice as paid. For the final invoice list all the work, enter the money already received under Deposit / payments already received and refer to the deposit invoice. The balance due shows the rest.
Sale to a tax-exempt customer
Mark the lines Non-taxable, enter the customer’s certificate number in the Customer section and choose a standard reason under Sales tax. Keep the certificate on file.
Invoice to a government agency
Federal contracts use the “proper invoice” definition of FAR 52.232-25: contractor name and address, invoice date and number, contract or order number, descriptions, quantities, unit and extended prices, shipping and payment terms, the person to pay and a contact for defects, and when required the TIN and bank details. Use the PO number and Contract number fields and your contact person. Agencies often require submission through their portal, for federal agencies usually the Treasury’s Invoice Processing Platform (IPP); upload the PDF there.
Sales to other states
Since the Supreme Court’s Wayfair decision (2018), a state can require you to collect its sales tax once your sales there pass a threshold, often $100,000 or 200 transactions per year, even without a physical presence. If that applies to you, enter the rate for the customer’s location. Invoice Studio uses one rate per invoice; for mixed locations create one invoice per location.
Customer outside the U.S.
Choose the country in the customer’s address and, if you bill in another currency, the currency under Invoice details. Export sales are generally not taxed in the U.S., but check your state’s rules; mark the lines non-taxable and add a note such as “Export: no sales tax”. Invoices in a currency other than US dollars are not added up in the reports.
Using it on your phone
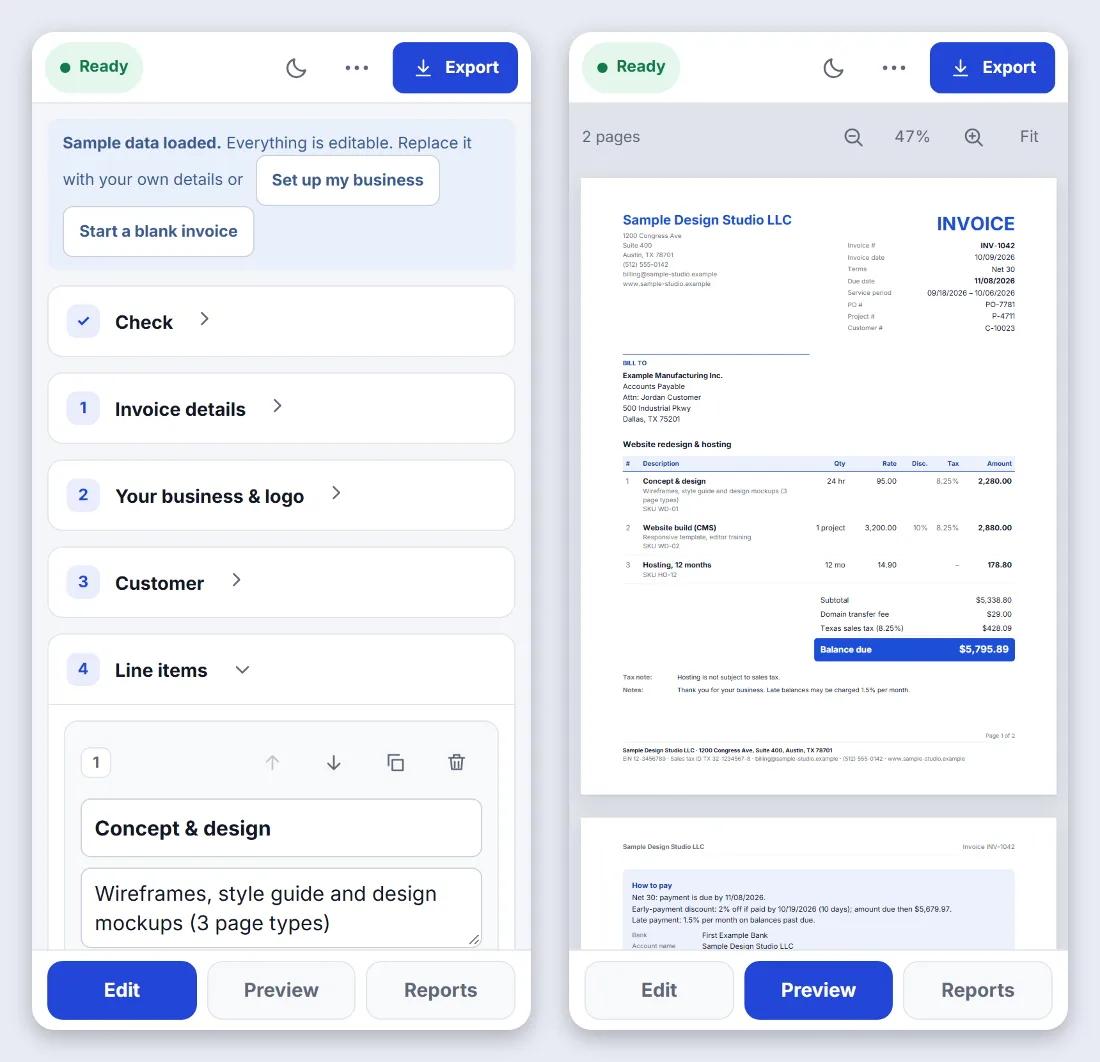
Invoice Studio works on a smartphone. A tab bar at the bottom switches between Edit, Preview and Reports. Double-tap the preview to zoom in or to fit it to the screen. Everything else works as on a computer. Only the automatic backup to a folder is not available in most mobile browsers; download the backup file instead.
Troubleshooting
The preview shows a dash or a field is highlighted red.
Open the Check section. Every error names the field; click the message to jump to it.
The ZIP code or EIN is rejected.
A ZIP code has 5 digits (or 5+4, for example 78701 or 78701-1234). An EIN has the format 12-3456789.
The routing number is rejected.
An ABA routing number has 9 digits and a built-in check digit. Compare it with your bank’s website or a check.
My invoices are gone.
Data is stored only in your browser. It is lost when you clear the browser data or use a private window. Restore a backup file under the Data backup button in the header → Restore a backup.
The PDF does not download.
Allow downloads for this site in your browser. In some embedded viewers downloads are blocked; open the tool in a normal browser tab.
The sales tax is wrong.
Check the rate under Sales tax and that each line is marked taxable or non-taxable. Shipping and fees have their own taxable setting.
Keyboard shortcuts and aids
| Key | Action |
|---|---|
| Ctrl + S | Save the invoice as a file (in Reports: save the data as .txt). On a Mac: Cmd + S. |
| ? | Open the keyboard shortcuts overview (not inside input fields) |
| Esc | Close a menu, dialog or explanation window |
| ↑ / ↓ | Move between the entries of an open menu; on a menu button, ↓ opens the menu |
| Home / End | Jump to the first or last entry of a menu |
| Tab | Go to the next field or button; with Shift, go back |
| Click text in the preview | Jumps to the matching form field |
| Double-tap (phone) | Zoom the preview in or fit it to the screen |
Related topics
- What an invoice needs: No federal law lists what an ordinary business invoice must contain.
- Payment terms (Net 30): Payment terms tell your customer when the money is due.
- Sales tax on invoices: There is no federal sales tax in the United States.
- Sales tax by state: Forty-five states and the District of Columbia charge a statewide sales tax, and most also allow cities and counties to add their own.
- Late fees and interest: You can ask for a late fee, but it usually only holds up if your customer agreed to it before the work, and states limit how high it can be.
- Tax-exempt customers: Some customers do not pay sales tax: resellers, many nonprofits and government agencies.
- Federal “proper invoice”: Federal agencies pay on a “proper invoice”.
- Keeping invoices: The IRS says to keep records that support your income and deductions until the period of limitations for the tax return expires.
- Deposit invoices: For bigger jobs you rarely wait until the end to be paid.